1. Download Zonely
Log in to your account on our website and go to My Account > My Products. Click the Download button to download the file to your system.(1).png?fit=max&auto=format&n=X2ISxdGjFwrTSWOa&q=85&s=7157fbd175ada04f0710e4c3b525350c)
2. Upload Zonely to Your Plesk Server
To upload the.ZIP file, navigate to Plesk > File Manager > httpdocs and upload the file to this directory.
.png?fit=max&auto=format&n=X2ISxdGjFwrTSWOa&q=85&s=d8a63a24e5a662f480fe86167e5ea494)
.png?fit=max&auto=format&n=X2ISxdGjFwrTSWOa&q=85&s=18f23765a233be5dfe8a92ad7e6cfeef)
3. Create a Database
You must create a database to store your website’s data. In the Plesk panel, go to Databases from the side menu and click Add Database.
4. Visit Your Website
When you visit your website, you’ll be automatically redirected to the Zonely setup screen. Follow the on-screen steps to complete the installation. If the site does not open, click here to review your DNS settings. Enter your company details as requested.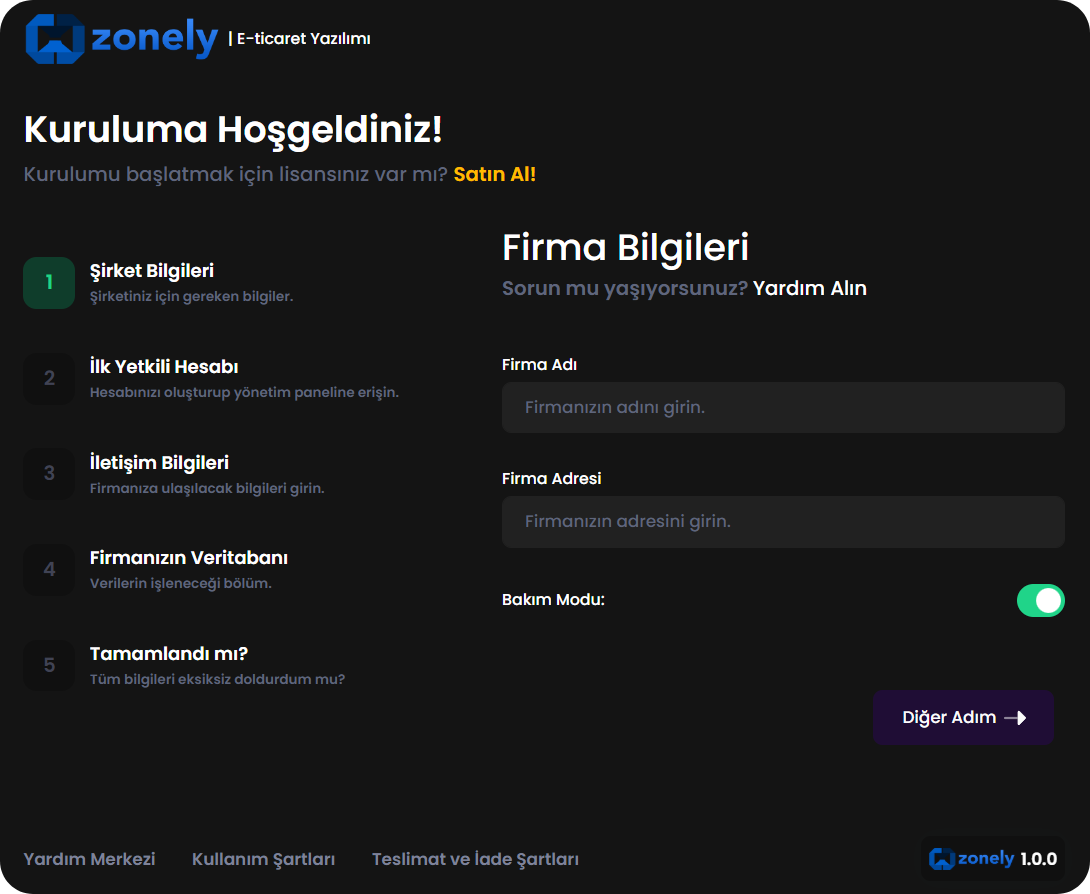
5. Create an Admin Account
After entering your team information, create an administrator account to start managing your website. If you selected “Username and Password” as your login method, use those credentials to access the admin panel..png?fit=max&auto=format&n=X2ISxdGjFwrTSWOa&q=85&s=ceb9f19c6104ec49f50f65ba2441ac93)
6. Enter Your Company Contact Information
Enter the contact details where your customers can reach you. You may leave these fields blank if desired..png?fit=max&auto=format&n=X2ISxdGjFwrTSWOa&q=85&s=d8da72a54465c743ea4e00f991e9dfce)
7. Enter the Database Information Created in Plesk
To ensure Zonely runs smoothly, enter your database connection details:- Host: Usually
localhost. Enter the IP if using an external database. - Port: Default is
3306. Enter your custom port number if applicable. - Database: The name of the database you created (e.g.,
zonely_db). - Username: The database username.
- Password: The password for that user.
If you encounter a connection error when testing the database, check user permissions and port forwarding settings.
.png?fit=max&auto=format&n=X2ISxdGjFwrTSWOa&q=85&s=f739dcec31e2e1f3e94ddb6d763dd64c)
8. Start the Installation
Click Complete Installation to allow Zonely to automatically configure all required files and data on your server..png?fit=max&auto=format&n=X2ISxdGjFwrTSWOa&q=85&s=691e6567a2e6b08c49be36990acef53f)